Step-by-step: “Self Portrait in Conversation”
Posted on: May 01, 2011
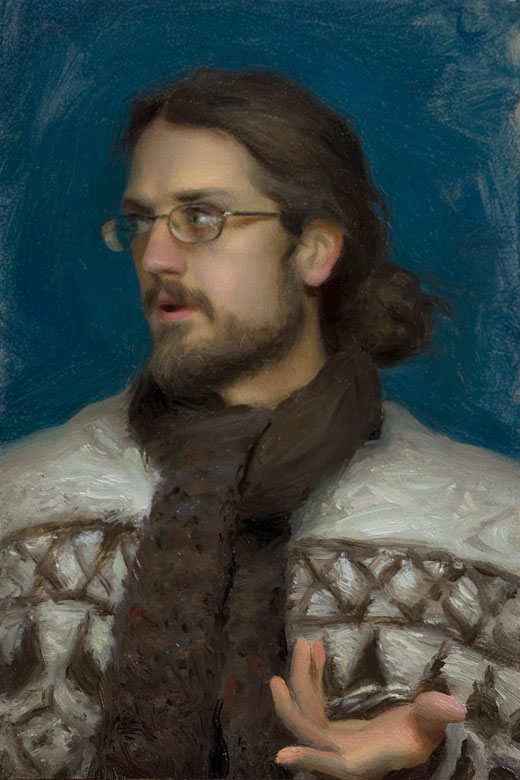
This little painting was my contribution to this year’s Portrait Society of America “6×9 Limited Size – Unlimited Talent” fundraiser. I have no idea what became of it at the event, but here’s how it was created:
The Concept
About the only time I get a good look at myself in a mirror is while brushing my teeth, and for awhile now I have thought that the particular shade of blue on my bathroom walls would make a nice background for a portrait. It even inspired my previous self portrait, which I thought was a very successful painting … except that the blue sheet that I used as a backdrop couldn’t quite replicate the color of those walls. So when I was asked to contribute to the Society’s fundraiser, it was a good excuse to try again. As for clothing, I spent most of this winter enveloped in knitted items, so the scarf & sweater were a natural choice.
I had actually wanted the painting to be entitled “Self Portrait Looking Up”, until I realized that this would have necessitated the use of like 4 mirrors instead of 2. The supplied 6″ x 9″ panel would also leave quite a bit of space below my head, so I decided to include my hand in the composition. The end result was this less-spiritually-significant-but-hopefully-still-visually-fascinating painting, “Self Portrait in Conversation” – painted mostly wet-into-wet over the course of two days (maybe 14 hours total).
My Setup

As you can see, painting a self portrait in profile requires at least two mirrors and a sink. I prefer to paint at a distance of 6 to 10 feet from my canvas, so this was tight quarters … but with a panel this small, it worked out fine. Whenever possible, I try to set up my paintings so that my subject and my canvas are illuminated by the same light source. I also toned my panel a couple of weeks in advance with a light transparent gray (raw umber + ultramarine blue).
Bonus points if you can name the CD that’s propping up my canvas :)
Step 1


For any painting that is simply a straightforward depiction of a scene right in front of me, I use a viewfinder to zero in on a composition. And for small ‘one-shot’ paintings, I rarely do a preliminary drawing. The major shapes are simply blocked in slowly and carefully – in this case I started with a brown mixture for my hair and the scarf, to immediately define the contour of my head and the gesture of the pose. Next I laid in a simple blue wash for the background. I also knew from experience that my sweater was actually darker than my brain thought it was, so I quickly laid in a simple tone in order to keep the rest of the picture in the right context going forward.
Early on I try very hard not to put ‘good paint over bad’ – if something is in the wrong place, I wipe it out with a cotton rag before adding fresh paint. As goofy as this step may look, it was enough to convince me that my shapes were placed reasonably enough to start blocking in my face….
Step 2

‘Blocking in my face’ is meant to be taken literally – I am deliberately laying down simple planes and simple color swatches (“look, my nose is red”). This step is considered ‘finished’ once I recognize the subject, despite having refrained from painting any real facial features.
Step 3

As soon as I actually start to paint the eyes, nose, and mouth in earnest, my portraits almost inevitably look really strange. This is okay. Students will often tell me that their painting-in-progress “looks awful”, to which I then reply, “no it doesn’t, it just needs to be finished”. The trick is to gain enough experience to be able to calmly keep seeing the next step … until your painting is truly resolved at whatever level of finish you’re aiming for (and which suits your personal nature).
Step 4

Continuing to render my head and facial features, and finally slapping down a couple of strokes to remind me that my hand will be in the finished picture. Notice that I have basically defined the finished effect (colors, values, and edges) of my shoulders and the scarf around my neck – they change very little from here on out. I want to lock these in early, as they are relatively simple decisions that will provide a context for the more subtle rendering in my face.
Since the edges of my hair and beard are pretty soft, I decided to let the line of my shoulders become fairly hard-edged to help pull my whole body in front of the background. But in order to keep the line of my shoulders from drawing too much attention, I fuzzed it out towards the edges of the canvas and lowered the value of my sweater as it meets the background. This value shift did happen in reality, but I exaggerated it for the sake of the painting’s overall impression.
Step 5

Here I’ve painted my hand in earnest and returned to refining my face. I decided to paint my hand simply and broadly, as opposed to my face which is more carefully rendered. Each element in this painting was handled in a different manner, hopefully resulting in a varied-but-harmonious impression:
- Background – thin and broadly painted
- Sweater – thick & ‘strokey’, but without defining the edges of the pattern too exactly
- Scarf – thick, wet, and stippled (in the finished painting)
- Face – rendered skin, with beard soft & scratchy
- Hand – thick and broadly painted
Step 6

Texturing the scarf, resolving the sweater, and continuing to refine the face. The portrait is a good likeness now, but the expression is a little fierce (“Self Portrait in Dispute”). This is mainly due to the angle and heaviness of the eyebrow on our left. For me, a portrait’s expression is usually the very last thing that falls into place during the painting process … which can be quite frustrating while leading a workshop, since my demonstration paintings rarely make it that far.
Step 7

Here I’ve refined the shape of my front eye, my nose, and my forehead, and I added finishing strokes to my hand, scarf, and sweater.

Notice that despite the increasing fineness of the rendering, I am still trying to represent the planes of my face as simply and clearly as possible … in many cases using color as much as value to do so. In this passage, the area above my lip was yellow, below my lip was orange, and my cheek went from red to green as it turned away from the light and picked up reflected light from the blue walls, before warming up again against my sideburns.
At this point the painting might have been finished … except:
- This photograph was taken under my bathroom lights, which are not particularly “natural”, and which provided a pretty steep falloff even on this little canvas (my head was illuminated more strongly than my hand. So when I took the painting back to my studio, I saw that the colors in my skin were too striking, and my hand and face didn’t match in color or brightness
:( - The paint is still wet here, and paint always dries in interesting ways – certain pigments dry darker than others, and some edges dry harder than I expect. For this reason I almost always apply a few subtle touchups on my paintings after they are dry.
Finishing Touches

This photograph was taken after waiting two weeks, applying a thin coat of retouch varnish, and adjusting anything that dried in an unexpected way or just didn’t sit well with me. Naturally, I couldn’t look at my subject (me in my bathroom) and work in my studio at the same time, but I find that after a certain point a painting takes on a life of its own, where you can perceive what it ‘needs’ regardless of the original subject matter.
Having said that, I did run over a few times to double-check certain things – particularly the shape of my mouth and the contour of my nose. I also sharpened the lefthand edge of my nose as I refined its shape, which helps pull it forward in space. My decisions regarding edges are always a combination of the following:
- What I see
- What I want to emphasize in the painting
- The texture of each object or surface
- What is in front of what in space
Here are some example of the last two:

Up Close: Painting My Hand
A closeup of the progression of the hand itself reveals a neat little study in straightforward broad-brush painting … until the last step, which was done after the painting was dry. It’s difficult to see in the photograph, but some of the work in the final photo was painted fairly thinly over the thick, dry paint – adjusting colors and softening transitions, while retaining the strength of the original brushstrokes.


![]()